
Beginner’s Guide: Setting Up WireGuard VPN on Amazon EC2 Simplified
Beginner’s Guide: Setting Up WireGuard VPN on Amazon EC2 Simplified
Introduction:
Virtual Private Networks (VPNs) have become essential for ensuring online privacy and security. WireGuard, a relatively recent VPN protocol, has gained significant attention for its simplicity, efficiency, and robust security features. In this blog post, we’ll delve into why WireGuard is an excellent choice and guide you through setting up a WireGuard server on Amazon EC2, both manually and using Docker.
Prerequisites
Before diving into the setup process, ensure you have the following prerequisites ready:
- EC2 Instance with Ubuntu OS:
Set up an Amazon EC2 instance running Ubuntu OS. Make sure you have the necessary credentials to access and configure the EC2 instance. A t2.micro instance with 1vCPUs and 1.0 GiB of memory also works for proof of concept and falls under the AWS free tier. - Docker Installed:
Ensure Docker is installed and properly configured on the EC2 instance. Docker will be used to facilitate the setup of WireGuard for improved efficiency and ease of deployment.
Why Choose WireGuard over other VPNs?
WireGuard stands out as a modern and efficient VPN protocol, offering several compelling advantages:
- Simplicity and Readability:
WireGuard is designed to be simple and easy to read, making it accessible to both experts and newcomers. - Reduced Attack Surface:
With a minimal codebase, WireGuard minimizes the potential attack surface, decreasing the likelihood of security vulnerabilities. - Easy Key Management:
Key management is simplified in WireGuard, making it easier to generate and handle keys securely. This simplicity facilitates faster setup and easier management of VPN connections. - Cross-Platform Compatibility:
WireGuard is cross-platform, supporting Linux, Windows, macOS, Android, iOS, and more, providing flexibility and ease of use across diverse devices and systems.
Manually Set Up WireGuard Server on Amazon EC2 🛠
- SSH into the EC2 machine and run the following commands to enter superuser mode and navigate to the WireGuard folder located at /etc/wireguard.
   $ sudo apt update
   $ sudo apt install wireguard -y
   $ sudo su
$ cd /etc/wireguard- Create the public key and private key, where the public key is used in peers/clients’ WireGuard configuration.
$ wg genkey | tee privatekey | wg pubkey | tee publickeyYou can customize the filenames by changing “privatekey” and “publickey” in the command.
- Create a configuration file in the WireGuard folder using the command:
touch wg0.conf- Give the required permissions to the wg0.conf, publickey, and privatekey files.
- Execute the
ifconfigcommand to determine your IP and network interface name.
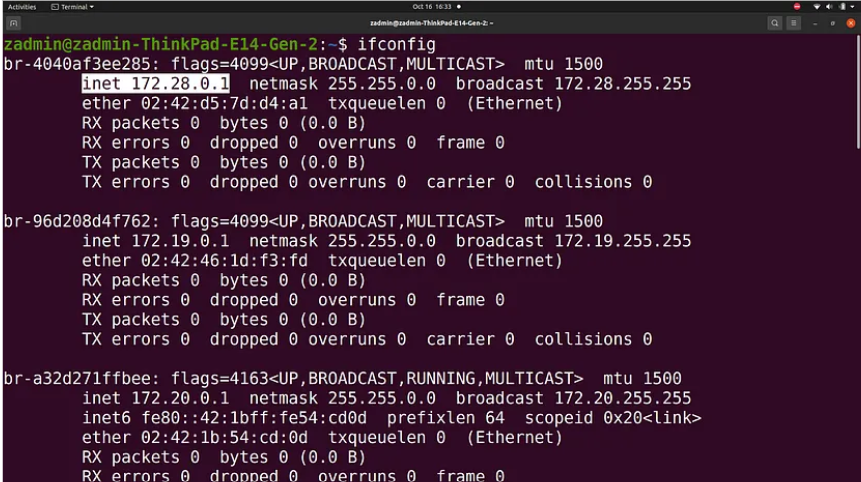
- In this case, the network interface name is “inet.”
- Copy the following code into the wg0.conf file and adjust the fields accordingly:
[Interface]
## Address: A private IP address for the wg0 interface.
Address = 10.20.10.1/24

## Specify the listening port of WireGuard, I use port 33333, you can change it.
ListenPort = 33333

## The PrivateKey of the server (cat /etc/wireguard/privatekey)
PrivateKey = PrivateKey_of_the_Server_found_in_privatekey_file

## The PostUp rule will run when the WireGuard Server starts the virtual VPN tunnel.
## The PostDown rules run when the WireGuard Server stops the virtual VPN tunnel.
## Specify the command that allows traffic to leave the server and gives VPN clients access to the Internet.

PostUp = iptables -A FORWARD -i wg0 -j ACCEPT

PostUp = iptables -t nat -A POSTROUTING -o Network_Interface_Name -j MASQUERADE

PostDown = iptables -D FORWARD -i wg0 -j ACCEPT

PostDown = iptables -t nat -D POSTROUTING -o Network_Interface_Name -j MASQUERADE
Ensure you enable port 33333/udp in the inbound rules of the security group assigned to your EC2 instance.
- Execute the command
wg-quick up wg0, and your WireGuard server is up and running.
WireGuard Setup Using Docker: Effortless and Lightning-Fast ⚡
Use the following script and paste it into a docker-compose.yml file:
version: '3.7'
services:
  wireguard:
    image: linuxserver/wireguard
    container_name: wireguard
    cap_add:
      - NET_ADMIN
      - SYS_MODULE
    environment:
      - PUID=1000
      - PGID=1000
      - TZ=Asia/kolkata # Set the correct timezone
      - SERVERPORT=51820 # Optional
      - PEERS=3 # Optional
      - PEERDNS=auto # Optional
      - ALLOWEDIPS=0.0.0.0/0 # Peer addresses allowed
      - INTERNAL_SUBNET=10.13.13.0/24 # Subnet used in VPN tunnel
      - SERVERURL=public ip of server # Wireguard VPN server address
    volumes:
      - /opt/wireguard-server/config:/config
      - /usr/src:/usr/src # Location of kernel headers
      - /lib/modules:/lib/modules
    ports:
      - 51820:51820/udp
    sysctls:
      - net.ipv4.conf.all.src_valid_mark=1
    restart: always
Modify the following fields:
PUID: Set the user ID for the container.PGID: Set the group ID for the container.TZ: Set the timezone (e.g., Africa/Nairobi).SERVERPORT: (Optional) Define the VPN server port (default: 51820).PEERS: (Optional) Specify the number of allowed peers (default: 3).PEERDNS: (Optional) Configure DNS settings for peers (default: auto).ALLOWEDIPS: Set the peer addresses allowed in the VPN tunnel (default: 0.0.0.0/0).INTERNAL_SUBNET: Set the subnet used in the VPN tunnel (default: 10.13.13.0/24).SERVERURL: Set the WireGuard VPN server address (replace with your public IP or domain).
Fire up the WireGuard server using the command docker-compose up -d.
Conclusion
There you have it, a beginner-friendly guide to setting up WireGuard VPN on Amazon EC2. We’ve covered the fundamentals, explored why WireGuard is a top choice, outlined essential prerequisites, and provided step-by-step instructions for both manual setup and Docker deployment. In the next blog, we’ll explore how to configure the WireGuard client.
Now it’s your turn to dive in and explore the world of secure, efficient VPNs with WireGuard. Feel free to reach out
